
Craftsman Chop Saw Manual: A Comprehensive Guide
This manual, dated 04/30/2026, provides a detailed walkthrough for Craftsman chop saw operation,
covering parts diagrams, setup, safety, and advanced cutting techniques for optimal performance.
Welcome to the world of precision cutting with your new Craftsman chop saw! This manual serves as your comprehensive guide, ensuring safe and effective operation. As of today, 04/30/2026, understanding your tool is paramount;
Craftsman has a long-standing reputation for durable, reliable power tools, and your chop saw is no exception.
Whether you’re a seasoned professional or a DIY enthusiast, this guide will walk you through every aspect – from initial setup and safety protocols to advanced cutting techniques. We appreciate your choice in Craftsman, and this manual is designed to maximize your satisfaction and productivity. Let’s begin unlocking the full potential of your chop saw!
Understanding Chop Saw Types
Chop saws, essential for accurate angle and straight cuts, come in several varieties. Standard chop saws utilize abrasive blades for cutting non-ferrous metals and plastics. Miter saws, often confused with chop saws, employ toothed blades primarily for wood.
Compound miter saws add bevel cutting capabilities, increasing versatility. Sliding compound miter saws offer even greater cutting capacity with a sliding rail. Craftsman offers models catering to diverse needs, from basic DIY projects to professional construction. Understanding these distinctions, as of 04/30/2026, is crucial for selecting the right saw and blade for your specific application.
Key Components of a Craftsman Chop Saw

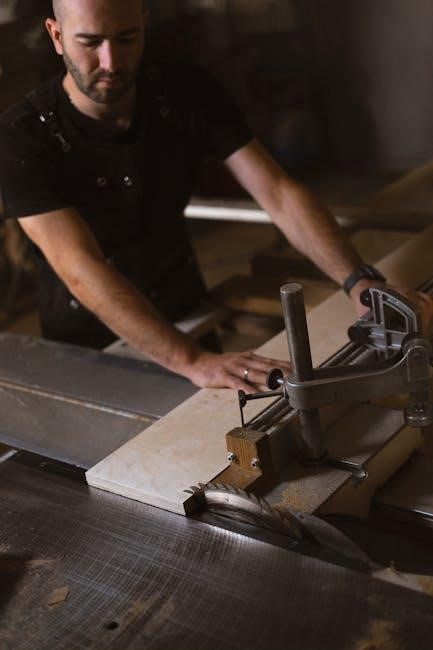
A Craftsman chop saw comprises several vital components working in unison. The robust base provides stability during operation, while the adjustable stand allows for comfortable working heights. The blade, crucial for cutting, requires careful selection based on material.
A trigger switch initiates the cutting process, often with a safety lock. The miter scale and bevel adjustment enable precise angled cuts. A blade guard enhances safety, and the workpiece clamp secures materials. As of 04/30/2026, understanding each component’s function is key to safe and efficient operation, as detailed in this manual.
Safety Precautions
Prioritizing safety is paramount when operating a Craftsman chop saw. Always disconnect the power before making adjustments or changing blades. Maintain a clean and well-lit workspace, free from obstructions. Never remove the blade guard, and ensure it functions correctly.

As of 04/30/2026, familiarize yourself with all safety features detailed in this manual. Secure the workpiece firmly to prevent movement during cutting. Avoid reaching around the blade, and never operate the saw if fatigued. Proper safety practices minimize risk and ensure a safe working environment.
General Safety Rules
Always read and understand this manual before operating your Craftsman chop saw, referencing the date 04/30/2026. Keep bystanders at a safe distance. Never force the saw; let the blade do the work. Inspect the power cord for damage before each use.
Maintain control of the workpiece at all times. Avoid awkward hand positions. Be aware of the blade’s stopping time after powering off. A safe operator is a focused operator, adhering to all guidelines for a secure cutting experience. Regular review of these rules is highly recommended.
Personal Protective Equipment (PPE)
Prioritize safety! As of 04/30/2026, always wear ANSI-approved safety glasses or a face shield to protect against flying debris. Hearing protection, such as earplugs or earmuffs, is crucial due to the saw’s loud operation.
Wear a dust mask or respirator when cutting materials that produce airborne particles. Sturdy work gloves enhance grip and offer minor protection. Avoid loose clothing or jewelry that could become entangled. Proper PPE minimizes risk and ensures a comfortable, safe working environment during all chop saw operations.
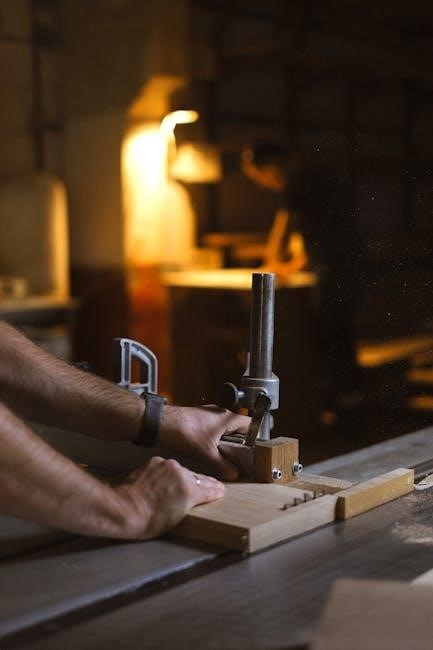
Workpiece Securing Guidelines
Effective workpiece securing, as of 04/30/2026, is paramount for accurate and safe cuts. Always clamp the material firmly against the fence, preventing movement during operation. Utilize a vise or clamps for smaller pieces, ensuring a stable hold.
For larger workpieces, consider using support stands to prevent sagging and potential kickback. Never attempt to hold the material by hand while cutting. Proper securing minimizes vibration, improves cut quality, and significantly reduces the risk of injury during chop saw usage.
Assembly and Setup
Following the instructions, current as of 04/30/2026, is crucial for proper assembly and setup of your Craftsman chop saw. Begin by carefully unboxing all components and verifying against the parts list. Assemble the base and stand, ensuring all bolts are tightened securely.
Next, install the appropriate blade, referencing the blade installation section for correct orientation and tightening procedures. Double-check all adjustments before powering on, guaranteeing a safe and efficient cutting experience. Refer to diagrams for clarity.
Unboxing and Inventory
Upon receiving your Craftsman chop saw (as of 04/30/2026), carefully inspect the packaging for any signs of damage during transit. Once opened, lay out all components and compare them against the included parts list.
Verify the presence of the chop saw itself, the base/stand components, the blade, any included wrenches or tools, and this user manual. Note any missing or damaged parts immediately and contact Craftsman parts support for assistance. A complete inventory ensures a smooth assembly process.
Base and Stand Assembly
Following the unboxing (dated 04/30/2026), assemble the base and stand according to the diagrams provided. Typically, this involves attaching the stand legs to the saw’s base using bolts and washers – ensure they are securely tightened.
Double-check all connections for stability before proceeding. A wobbly base compromises cutting accuracy and safety. Refer to the parts diagram to correctly orient each component. Proper assembly is crucial for safe and efficient operation of your Craftsman chop saw.
Blade Installation and Adjustment

Referencing the parts diagram (as of 04/30/2026), carefully install the blade onto the arbor, ensuring the correct rotation direction. Secure it with the provided flange and retaining nut, tightening firmly but not excessively.
Adjust blade depth and angle according to your cutting needs. Utilize the saw’s adjustment knobs for precise control. Always disconnect the power supply before blade changes or adjustments. Verify blade alignment before operation to prevent kickback and ensure accurate, clean cuts.
Operating Instructions
Before operation (as of 04/30/2026), confirm proper blade installation and secure workpiece clamping. Power on the saw, allowing it to reach full speed before initiating any cuts.
Maintain a firm grip and guide the workpiece smoothly through the blade. Avoid forcing the cut; let the saw do the work. For miter and bevel cuts, utilize the saw’s adjustable settings, ensuring they are locked securely. Always power off and disconnect the saw after use, following all safety guidelines.
Powering On and Off
As detailed in the manual (dated 04/30/2026), before powering on, verify the blade is correctly installed and the workpiece is securely clamped. Locate the power switch – typically a trigger or button – and depress firmly to initiate operation.
Allow the blade to reach full speed before commencing any cuts. To power off, release the trigger/button. Always disconnect the power cord from the outlet when changing blades or performing maintenance. Never leave the saw unattended while powered on.
Making Straight Cuts

Referencing the manual dated 04/30/2026, for precise straight cuts, ensure the workpiece is firmly against the fence. Slowly lower the blade lever, maintaining consistent pressure and a 90-degree angle to the material. Avoid forcing the cut; let the blade do the work.
A smooth, controlled descent yields the cleanest results. After the cut, fully raise the blade before lifting the workpiece. Regularly check the fence alignment for accuracy, as detailed in the parts diagram section.
Miter and Bevel Cuts Explained
As outlined in the manual dated 04/30/2026, miter cuts create angled crosscuts, adjusted by unlocking and rotating the saw table. Bevel cuts angle the blade itself for slicing through material at an incline. Utilize the saw’s detents for common angles like 45 and 90 degrees, ensuring a secure lock before cutting.
For custom angles, carefully adjust the pointer and tighten the locking knob. Always double-check the angle setting before initiating the cut, referencing the parts diagram for proper adjustment points.
Blade Selection and Maintenance
According to the manual, last updated 04/30/2026, choosing the correct blade is crucial. Abrasive blades suit non-ferrous metals, while diamond blades excel with masonry. For wood, select blades with appropriate tooth count – higher for finer cuts. Regular maintenance extends blade life.
Inspect blades for damage before each use. Sharpening restores cutting efficiency, and replacement is necessary when damage is extensive. Refer to the parts diagram for compatible blade types and secure mounting procedures, ensuring optimal performance and safety.
Choosing the Right Blade for the Material
As detailed in the manual, current as of 04/30/2026, blade selection directly impacts cut quality and safety. Wood requires blades with varying tooth counts; finer cuts demand higher tooth counts. Non-ferrous metals benefit from abrasive blades, while masonry necessitates diamond-tipped options.
Always consult the parts diagram to ensure compatibility. Incorrect blade usage can lead to kickback or damage. Prioritize blade material matching the workpiece. Proper selection maximizes efficiency and minimizes risk, contributing to a successful and safe cutting experience.
Blade Sharpening Techniques
According to the manual, updated 04/30/2026, maintaining a sharp blade is crucial for safety and precision. Dull blades require more force, increasing kickback risk. Sharpening involves using a blade sharpening tool, following the manufacturer’s instructions carefully.
Consistent sharpening angles are vital for uniform cuts. Alternatively, professional sharpening services are available. Regularly inspect blades for damage; severely damaged blades should be replaced, referencing the parts diagram for correct replacements. Prioritize safety during sharpening, wearing appropriate PPE.
Blade Replacement Procedures
As detailed in the manual, last updated 04/30/2026, always disconnect the power source before any blade work. Consult the parts diagram to ensure you have the correct replacement blade. Loosen the blade clamp and remove the worn blade, noting its orientation.
Install the new blade, ensuring proper direction of the teeth. Securely tighten the blade clamp. Double-check the blade’s stability before powering on. Proper installation, guided by the manual, is vital for safe and accurate operation. Dispose of old blades responsibly.
Troubleshooting Common Issues
Referencing the latest manual update of 04/30/2026, this section addresses frequent problems. If the saw won’t start, check the power cord, switch, and circuit breaker. For inaccurate cuts, verify blade alignment and secure workpiece clamping. Blade wobbling, as detailed in parts diagrams, often indicates a loose clamp or damaged blade.
Always disconnect power before inspection. Consult the manual’s diagrams for component locations. If issues persist, contact Craftsman support for assistance. Prioritize safety and avoid forcing operation.
Saw Won’t Start
As of the 04/30/2026 manual revision, a non-starting saw requires systematic checks. First, ensure the power cord is securely plugged into a functioning outlet. Verify the outlet’s circuit breaker hasn’t tripped. Next, inspect the on/off switch for damage or obstructions. Confirm the safety lock is fully disengaged.
If these steps fail, consult the parts diagram to locate and inspect the motor brushes. A faulty brush can prevent startup. Never attempt repairs without disconnecting power.
Inaccurate Cuts
According to the 04/30/2026 manual, inaccurate cuts often stem from improper blade alignment or a dull blade. Begin by verifying the miter and bevel angles are correctly set and locked. Ensure the workpiece is firmly secured against the fence, preventing movement during cutting. A wobbly blade, as noted in troubleshooting, also contributes to inaccuracy;
Inspect the blade for damage or excessive wear. Refer to the blade selection guide for the appropriate blade type for your material. Precise cuts require a sharp, correctly installed blade.
Blade Wobbling or Runout
As detailed in the 04/30/2026 manual, blade wobble or runout indicates a problem with the blade mounting or the saw’s spindle. First, ensure the blade is securely tightened to the arbor using the correct wrench. Inspect the arbor flange for damage or debris that could prevent proper blade seating.
A damaged spindle bearing can also cause wobble. If the issue persists, discontinue use and consult the parts diagram to order a replacement spindle or bearing. Ignoring this can lead to inaccurate cuts and potential safety hazards.
Maintenance and Care
Following the guidelines in the 04/30/2026 manual, regular maintenance extends your Craftsman chop saw’s lifespan. After each use, thoroughly clean debris from the base, table, and blade guard. Use a brush or vacuum; avoid compressed air which can force dust into bearings.
Periodically lubricate the pivot points and moving parts with a light machine oil. Store the saw in a dry environment, covered to prevent dust accumulation. Refer to the parts diagram for lubrication points and replacement part availability.
Regular Cleaning Procedures
As detailed in the 04/30/2026 Craftsman manual, consistent cleaning is vital. After every use, disconnect the power source. Remove any accumulated sawdust or metal shavings from the saw’s base, table, and blade guard using a brush and/or vacuum.
Avoid using compressed air, as it can redistribute dust into sensitive components; Inspect the blade for pitch buildup and clean with appropriate solvent. Wipe down all surfaces with a clean, dry cloth. A clean saw ensures accurate cuts and prolongs its operational life.
Lubrication Points
Referring to the Craftsman manual dated 04/30/2026, periodic lubrication maintains smooth operation. Focus on the pivot points of the chop saw head – apply a few drops of high-quality machine oil after every 25 hours of use.
Also, lubricate the blade’s arbor shaft. Avoid over-lubrication, as excess oil attracts dust. Check the sliding rails for smooth movement and apply oil if needed. Regularly inspect and lubricate the motor bearings, if accessible, following the manufacturer’s recommendations for optimal performance and longevity;
Long-Term Storage Guidelines
As per the Craftsman manual, dated 04/30/2026, prepare your chop saw for extended storage by thoroughly cleaning it, removing all sawdust and debris. Apply a rust preventative to all metal surfaces, including the blade and table.
Disconnect the power cord and store it separately. Cover the saw with a dust cover to protect it from moisture and dust accumulation. Store in a dry, climate-controlled environment. Periodically check for rust and reapply preventative as needed to ensure readiness when you need it again.
Parts Diagram and Replacement
Referring to the Craftsman documentation, last updated 04/30/2026, a detailed parts diagram is crucial for identifying components needing replacement. This diagram illustrates each part’s location and corresponding part number.
To order replacements, utilize the Craftsman parts support resources – their website or customer service line. Have your model number readily available. Ensure compatibility before ordering. Proper replacement maintains saw functionality and safety, extending its lifespan. Always consult the manual before disassembly and replacement procedures.
Identifying Key Parts
As of 04/30/2026, the Craftsman chop saw’s key parts include the base, stand, blade, blade guard, vise, miter scale, bevel adjustment, power switch, and motor housing. The parts diagram, essential for understanding their arrangement, clearly labels each component.

Familiarize yourself with these parts before assembly or maintenance. Knowing their function aids in troubleshooting and safe operation. The vise securely holds the workpiece, while the miter and bevel adjustments enable angled cuts. Accurate identification is paramount when ordering replacements, ensuring compatibility and proper functionality.
Ordering Replacement Parts
Referencing the parts diagram (updated 04/30/2026) is crucial when ordering Craftsman chop saw replacement parts. Note the part number and description for accurate ordering. Craftsman offers several avenues for procurement, including the official Craftsman website and authorized retailers.
When contacting support, have your model number readily available. Online ordering typically requires account creation. Ensure compatibility before finalizing your purchase. Craftsman’s support resources can assist with part identification and availability. Proper part replacement maintains saw functionality and safety, extending its lifespan.
Craftsman Parts Support Resources
Craftsman provides extensive support, as of 04/30/2026, for locating and acquiring replacement parts for your chop saw. The official Craftsman website features a comprehensive parts lookup tool, searchable by model number. A dedicated customer service hotline is available for personalized assistance with part identification and ordering.
Furthermore, numerous online forums and communities offer user-to-user support and advice regarding parts sourcing. Authorized Craftsman service centers can also assist with repairs and part replacements. Utilizing these resources ensures you maintain your chop saw’s optimal performance and longevity.
Advanced Techniques

Beyond basic cuts, a Craftsman chop saw excels with refined techniques. Cutting diverse materials – wood, metal, and plastic – requires appropriate blade selection and speed adjustments, as of 04/30/2026. Employing clamps and custom-built jigs dramatically enhances accuracy and repeatability for complex projects.
Optimizing cutting speed involves balancing material type, blade quality, and consistent pressure. Mastering miter and bevel adjustments unlocks intricate angles. Regularly inspecting and maintaining blade sharpness is crucial for clean, efficient cuts and prolonged tool life.
Cutting Different Materials (Wood, Metal, Plastic)
A Craftsman chop saw’s versatility extends to various materials, but proper technique is key, as noted on 04/30/2026. For wood, a fine-tooth blade delivers clean cuts. Metal requires a specialized blade, reduced speed, and cutting oil for lubrication and extended blade life. Plastic demands a high-tooth count blade to prevent melting and splintering.
Always secure the workpiece firmly. Adjust cutting speed based on material hardness; slower for metal, faster for softer woods. Consistent pressure and proper blade selection are paramount for achieving professional results across all material types.
Using Clamps and Jigs
Enhance precision and safety with clamps and jigs, essential for repeatable cuts, as of 04/30/2026. Clamps securely hold smaller workpieces, preventing movement during operation. Jigs, custom-built or purchased, guide the material for angled or complex cuts, ensuring consistency.
Always position clamps and jigs to avoid interfering with the blade’s path. Utilize a robust clamping force, but avoid damaging the workpiece. Proper jig design minimizes vibration and maximizes accuracy, leading to professional-quality results and improved operator safety.
Optimizing Cutting Speed and Accuracy
Achieving optimal results, as of 04/30/2026, requires balancing cutting speed and accuracy. Avoid forcing the blade; let the saw’s power do the work. A slower, controlled feed rate generally yields cleaner, more precise cuts, especially with harder materials. Ensure the workpiece is firmly secured to prevent movement.
Regular blade maintenance – sharpening or replacement – is crucial. Correct blade selection for the material being cut significantly impacts speed and finish. Consistent practice and attention to detail will refine your technique, maximizing both efficiency and quality.